
Monday, July 8, 2019
How to Type Bangla with Unijoy Layout in Void Linux
Thursday, June 6, 2019
How to Run Redox OS for Fun

Wednesday, May 15, 2019
How to Install and Use Brother HL-2130 Laser Printer on Debian

Thursday, May 9, 2019
How I Fixed Thinkpad Trackpoint Not Scrolling When Plugged In

Monday, February 11, 2019
Playing With Fixes for Atheros Wifi Card Not Connecting on Parabola (Arch Linux)

Thursday, December 13, 2018
Prepare a Lightweight Linux Distro - Slax - to Play with!

Tuesday, November 27, 2018
Running Automated Tests on Websites using Codeception

Thursday, September 6, 2018
Solving Funky Problems on Arch Linux with Linux LTS Kernel

Sunday, May 6, 2018
How to build Textadept from Source

Sunday, September 10, 2017
How to install XAMPP in Linux and make WordPress update work perfectly!

Step 1: Install XAMPP (LAMPP)
If you have not installed XAMPP yet on your linux machine, then first do so. I have written a tutorial here.Step 2: Create Group for XAMPP Users and put yourself in!
* Replace "username" with your username.sudo groupadd xamppusers
sudo usermod -a -G xamppusers username
groups username
The last command will show you the groups that your username is in. If you have xamppusers group in the list, then you are good.
Step 3: Own the files!
Run this:cd /opt/lampp
sudo chown -R username.xamppusers htdocs
sudo chmod -R 775 htdocs
This will relax the file permissions of your htdocs folder, so you have less trouble. And also change the owners to the username you chose. You will taste great feedoms when editing files and modifying files with php after this.
Step 4: Edit the httpd.conf
httpd.conf is the configuration file for Apache.First backup the conf file:
sudo cp /opt/lampp/etc/httpd.conf /opt/lampp/etc/httpd.conf.bak
Edit the file:
sudo nano /opt/lampp/etc/httpd.conf
You will find two lines saying something like this:
Tip: You can press Ctrl+W, type user daemon and press enter to find it quickly.
User daemon
Group daemon

Replace it with your values, something like this:
User username
Group xamppusers
Step 5: Restart XAMPP
This step is very important. If you do not do this the changes you made in httd.conf file will not be taken.sudo /opt/lampp/lampp restartor, use the GUI Control Panel if you have it.
Bonus Tip: Accessing htdocs from home directory
ln -s /opt/lampp/htdocs/ ~/htdocs
You will then be able to see a link to the "htdocs" folder in your home folder. This is so convenient for accessing files on htdocs.
Conclusion
After doing all this hard work you will be able to install Wordpress without any permission issues whatsoever. Also update Wordpress without any problem.Plugin update also works!

Tuesday, August 22, 2017
NGROK - A nifty little program to share your localhost with everyone
We have live sites for running client sites, we have staging sites for testing. But what about localhost sites. We sometimes have some test code running in local that we want the world to see!
NGROK is a tiny program that let's you temporarily create an url for your localhost! And anybody with the URL can visit this and enjoy the goodness within!
Moreover it does not need install, runs on Windows, Linux, Mac, BSD or ARM, plus its open source. How cool can it get?!
Basics (for geeks)
To run NGROK is easy. Just download from https://ngrok.com/download, cd to that directory and run: ngrok http
And this will give you an url to access the localhost on your machine. Please keep in mind that the url will work only if the command line window is running, so you cannot close it while you want others to see it.
Also, make sure that you have entered the correct port number in the command that the apache running in. In a typical Windows installation with XAMPP installed, it runs in port 80. If not sure you can check in the XAMPP Control panel to see its port or check on httpd.conf.
Detailed Instructions (for beginners)
- Run apache + mysql + whatever you have!
- Determine the port in which apache is running. Usually it is 80. But to make sure you can:
- In Windows: Check the XAMPP Control Panel GUI. It should have the port number under Port(s).
- In Linux/LAMPP: Check
/opt/lampp/etc/httpd.confThis should have the port number listed there somewhere. You can search forportand a line likeListen 80will be there. 80 is the port number here in this example. - In other cases, run
httpd -Vand this will show the path of thehttpd.conf. Check that file for the port in aListenline.
Take a note of this port number.
- Download NGROK: https://ngrok.com/download
- Extract it. You will then have the ngrok executable file ready for your testing.
- cd to that directory.
- In Windows: Go to the directory where the executable (exe) file is. Keep pressing shift and right click on empty space, then choose Open command window here.
- In Linux: Visit the file in your File Manager, right click on empty space, then choose Open in terminal. This option maybe also available in the Tools menu. You can also type cd and then a space, then drag and drop the folder in a terminal window and press enter.
- Run ngrok in Command prompt/Terminal:
ngrok http 80(replace 80 with your port number, if your port number is different)
This will eventually connect and show you an url, something like this: https://65f6sc3b.ngrok.io
Take note of this url.
Keep this window open up to the time that you want the url to work.
- Open the URL in your browser to test if this can be accessed correctly.
- For Wordpress sites, you may see that the URL changing to "localhost" sometimes. If this is the case, then you would need to install this plugin: https://wordpress.org/plugins/root-relative-urls/ (This plugin is intended for use in development environment only, not for live or production use.)
Ref:
Sunday, July 10, 2016
How to Create Signed APK Using Only Cordova CLI
Monday, May 23, 2016
How to Build your First Mobile App using Cordova
Tuesday, May 10, 2016
Typing in Bangla using Unijoy on Arch Gnome
Unijoy is my favorite keyboard layout to type Bangla in Linux and Windows. In this short article I give you the instructions to type in Bangla in any Arch based Gnome Distro. I have tested this on Manjaro Gnome 15.12 (updated to Gnome 3.20.1).
Wednesday, April 27, 2016
How to install Ubuntu 16.04 LTS inside Windows without partitioning
Linux without the hassle of partitioning. How to do it? Here is the answer. You can uninstall whenever you want!
Thursday, December 17, 2015
How to install Linux on Pendrive using F2FS Filesystem
Well, F2FS filesystem is specially designed by Samsung which is good for SSDs and pendrives. It makes the read and write operations on the devices much faster, because it is specially designed for those mediums. Even take a look at these benchmarks to prove that F2FS performance is better.
Monday, June 8, 2015
At last I can access Recovery Mode in Symphony GoFox F15! (with video)
As I blogged earlier, I got myself a Symphony GoFox F15 phone which runs the darling of open source, Firefox OS. This phone is now very cheap, new at BDT 2000. Insane, right? If you are a young passionate developer, now is the right time to buy it, and mingle with this amazing creation.
Tuesday, May 19, 2015
How to Install XAMPP in Linux (With GUI CP)
Saturday, January 24, 2015
Success! Symphony Gofox F15 ADB connection working under Ubuntu!
Recently I bought a Symphony Gofox F15 Firefox OS phone that is available in Bangladesh for $60 (4650 BDT). I bought a used one from bikroy.com with 3100 BDT. It is not a very appreciable set in terms of performance but it works. It is a Firefox OS 1.4 phone having 512mb RAM & ROM that gets a bit slow on heavy usage.
As a Web Developer myself I am thrilled that an entire mobile phone can be operated from browsers. If you are new to the trend, everything you see on FFOS is running on browsers, every button that you click is a <a> or <button> tag, every image that you see is either CSS or an <img> tag. So the OS takes very less RAM and resources to run, on theory.
But I must admit, some features are very well thought and they are way ahead compared to some earlier versions of Android. The 2.0 version also comes with a brilliantly designed UI that'll impress you for sure.
The good fun in ADB connection is the fact that you can run the app, debug it, touch different elements and inspect it in real time from your desktop PC! You can even modify styles of app drawer in an instant and with only changing some good old CSS codes.
As you expect, as it is less used in Bangladesh, I couldn't find the appropriate drivers for the phone's ADB connection. Although Mass storage worked right out of the box. The conclusion is, in Windows (both 32 & 64 bit) I failed to load it in WebIDE. But I succeeded in Ubuntu. Here's how I did it:
First ran the command on terminal:
2. Now run:
Earlier versions are less likely to work. It is best to get the latest possible version.
Get the Firefox tar file, extract it in a directory like this:
2. Installed the ADB Helper
from here: https://ftp.mozilla.org/pub/mozilla.org/labs/fxos-simulator/
2. Disabled Screen Lock from Settings -> Screen Lock (Because if the screen lock comes, the debug bridge will be stopped.)
3. Most importantly, enabled Developer menu, Settings -> Device Information -> More Information and checked "Developer Menu". A Developer item is now revealed in the Settings.
Then enabled ADB option from Settings -> Developer -> Remote Debugging -> ADB and Devtools.
1. Found a good cable from another phone and conneted with it. The cable given in the box does not work. Also sometimes, I heard, using a USB port directly on the motherboard helps. But I used extension cord and still got connection. I was lucky!
2. Started Firefox Nightly (from home/Apps/firefox) and opened about:app-manager through the addressbar. It showed a button with a strange number at the bottom. I clicked on it. It showed some errors, like this:
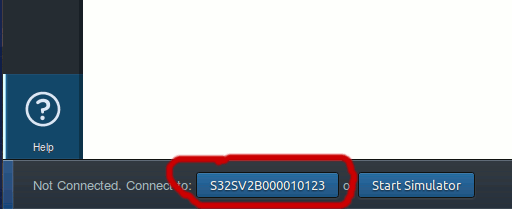
3. Out of curiosity I ignored the message and then tried opening the WebIDE (from Firefox menu -> Developer -> WebIDE.) and it showed the device in the Menu on the right side! This time it also showed the strange number, not exactly the device name (S32SV2B000010123). But I clicked on it anyway.
(After requesting connection with the device, there will be a message in your phone asking whether you want your Desktop to connect with your phone. Tap on OK button on your phone when it comes.)
Surprisingly, it connected!
4. I disabled and re-enabled ADB from Settings, started Firefox Nightly, plugged in the phone, started WebIDE and voila! It came with the right name!
Here goes a screenshot to my success!

2. Use a good quality cable
3. Connect it directly in the USB port of motherboard
4. Try enabling and disabling ADB option if doesn't get detected
5. Use this page to troubleshoot .
Anytime I wanted to connect, I just followed the point 4 under step 4.
Now I can create Apps in my Firefox browser and run it directly on my phone! yayy!
Help & ref:
https://bugzilla.mozilla.org/show_bug.cgi?id=936909
https://developer.mozilla.org/en-US/docs/Tools/WebIDE/Troubleshooting
As a Web Developer myself I am thrilled that an entire mobile phone can be operated from browsers. If you are new to the trend, everything you see on FFOS is running on browsers, every button that you click is a <a> or <button> tag, every image that you see is either CSS or an <img> tag. So the OS takes very less RAM and resources to run, on theory.
But I must admit, some features are very well thought and they are way ahead compared to some earlier versions of Android. The 2.0 version also comes with a brilliantly designed UI that'll impress you for sure.
The good fun in ADB connection is the fact that you can run the app, debug it, touch different elements and inspect it in real time from your desktop PC! You can even modify styles of app drawer in an instant and with only changing some good old CSS codes.
As you expect, as it is less used in Bangladesh, I couldn't find the appropriate drivers for the phone's ADB connection. Although Mass storage worked right out of the box. The conclusion is, in Windows (both 32 & 64 bit) I failed to load it in WebIDE. But I succeeded in Ubuntu. Here's how I did it:
Connecting Gofox F15 for ADB/WebIDE in Ubuntu:
Step 1: Prepping the Ubuntu:
1. Created an udev rule for the device.First ran the command on terminal:
sudo gedit /etc/udev/rules.d/51-android.rulesThen added the following code in the file and saved:
SUBSYSTEM=="usb", ATTRS{idVendor}=="1782", MODE="0666"(I got the 1782 value from running lsusb command.)
2. Now run:
sudo service udev restart
Step 2: Prepping Firefox Desktop:
1. Got the latest Firefox Nightly for Linux (currently version 38) from hereEarlier versions are less likely to work. It is best to get the latest possible version.
Get the Firefox tar file, extract it in a directory like this:
cd ~(I have created and chosen the "Apps" directory. You can use any directory you want.)
mkdir Apps
cd Apps
tar xvf 'path/to/firefox-xxx.tar'
2. Installed the ADB Helper
from here: https://ftp.mozilla.org/pub/mozilla.org/labs/fxos-simulator/
Step 3: Prepping the Phone:
1. Turned on the USB Storage option from Settings2. Disabled Screen Lock from Settings -> Screen Lock (Because if the screen lock comes, the debug bridge will be stopped.)
3. Most importantly, enabled Developer menu, Settings -> Device Information -> More Information and checked "Developer Menu". A Developer item is now revealed in the Settings.
Then enabled ADB option from Settings -> Developer -> Remote Debugging -> ADB and Devtools.
Step 4: Bridging the ADB:
1. Found a good cable from another phone and conneted with it. The cable given in the box does not work. Also sometimes, I heard, using a USB port directly on the motherboard helps. But I used extension cord and still got connection. I was lucky!
2. Started Firefox Nightly (from home/Apps/firefox) and opened about:app-manager through the addressbar. It showed a button with a strange number at the bottom. I clicked on it. It showed some errors, like this:
12:34:56: connection error. Possible causes: USB port not connected, port not forwarded (adb forward), wrong host or port, remote debugging not enabled on the device.
3. Out of curiosity I ignored the message and then tried opening the WebIDE (from Firefox menu -> Developer -> WebIDE.) and it showed the device in the Menu on the right side! This time it also showed the strange number, not exactly the device name (S32SV2B000010123). But I clicked on it anyway.
(After requesting connection with the device, there will be a message in your phone asking whether you want your Desktop to connect with your phone. Tap on OK button on your phone when it comes.)
Surprisingly, it connected!
4. I disabled and re-enabled ADB from Settings, started Firefox Nightly, plugged in the phone, started WebIDE and voila! It came with the right name!
Here goes a screenshot to my success!
Remarks:
1. Use shorter cable if possible2. Use a good quality cable
3. Connect it directly in the USB port of motherboard
4. Try enabling and disabling ADB option if doesn't get detected
5. Use this page to troubleshoot .
Anytime I wanted to connect, I just followed the point 4 under step 4.
Now I can create Apps in my Firefox browser and run it directly on my phone! yayy!
Help & ref:
https://bugzilla.mozilla.org/show_bug.cgi?id=936909
https://developer.mozilla.org/en-US/docs/Tools/WebIDE/Troubleshooting
Monday, January 5, 2015
Notepad++ - how to run a python script quickly
I was making a mp3 player python script the other day and I had to use IDLE for the advantage of running the script.In IDLE you have a nifty keyboard shortcut F5 to run the script immediately. There is nothing wrong with it until I found out some commenting shortcuts that I don't like and some features that I miss from my favorite text editor Notepad++.
I was searching for a solution how to have a run feature just like the Python IDLE so that I can use Notepad++ for my purpose. I found some solutions but none of them worked for my purpose perfectly.
I tried NPP Exec plugin, and some other solutions but this one worked best for me.

2. Copy and Paste the following:
After that you can just press enter to run the script. But we want to save our command for later use. And we would also add a keyboard shortcut to that command.
3. Then click "Save..."

4. I have named my command "Run Python script"
5. I have assigned a Ctrl+F5 keyboard shortcut to run the current script. But you can choose whatever is convenient to you.
And don't forget to save the file before pressing Ctrl+F5.
So everytime you have to run a python script, just press Ctrl+F5. Good luck.
I was searching for a solution how to have a run feature just like the Python IDLE so that I can use Notepad++ for my purpose. I found some solutions but none of them worked for my purpose perfectly.
I tried NPP Exec plugin, and some other solutions but this one worked best for me.
Solution
1. Press F5.2. Copy and Paste the following:
After that you can just press enter to run the script. But we want to save our command for later use. And we would also add a keyboard shortcut to that command.
3. Then click "Save..."
4. I have named my command "Run Python script"
5. I have assigned a Ctrl+F5 keyboard shortcut to run the current script. But you can choose whatever is convenient to you.
And don't forget to save the file before pressing Ctrl+F5.
So everytime you have to run a python script, just press Ctrl+F5. Good luck.
Subscribe to:
Posts (Atom)